A really neat feature of Pitcherific Enterprise is the ability to create your very own pitch templates. So if you have something specific that you want your students to prepare for to a presentation or exam, you can help them out by using the Pitch Template Designer.
You can even attach Question Cards that will appear after they’ve practiced their pitch, so they can be well-prepared for whatever curveballs that might be thrown at them.
Let’s take a deeper look at how it works.
Creating a tailor-made pitch template for your students
To begin creating your pitch template, first, go to the Templates page in your Dashboard.
On that page, you can view all pitch templates that have been created by you and your colleagues. If no templates have been made yet, you will be able to start creating on by clicking on the big, clickable area that appears.
In most cases, start by clicking the Create new template button in the upper right. This will open up the Pitch Template Designer with a blank pitch template for you to fill in.

The basics of a pitch template
With the blank pitch template open, start by giving your template a name and decide which time limits your students should be able to choose from when selecting your template in the tool.
We recommend that you give them a few time limits to choose between, but if you know that they have a specific maximum to keep their presentation within then just go with that one time limit.
It’s also recommended to write a short description of your pitch template, but it’s not required. It just makes it easier for your students to understand what the template is for.
Adding sections and understanding weight
The most important part of a pitch template is the actual template sections. These contain the specific areas of focus that you want your students to reflect upon and answer. By filling out each section and improving them afterwards, your students will eventually end up with a well-prepared script that they can then practice in the teleprompter.
So, well-written sections from your side will help your students tremendously using your pitch template. Therefore, we recommend that you add a description and a helpful example to each section you add. Your students will be glad you did.
To add a section to your template, click on the Add one more section are at the bottom of the template you’re creating (You may have to scroll down a bit).
After adding a section, start by giving it a descriptive title. This will be the headline of the section when a student chooses your template in the tool. Check out the existing templates in the tool if you need any inspiration.
Next, you could fill in the Task and Example fields as described earlier, but even though we recommend it, it’s purely optional.
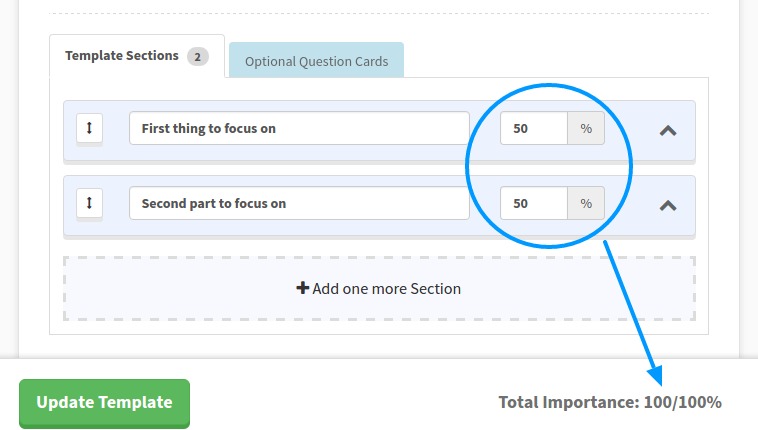
Finally, each section has a Weight which goes from 5% to 100%. Weight translates directly to the amount of recommended characters that your students can write in a given section. And those characters reflect how many seconds each section will approximately take to speak.
Remember, the total weight cannot be more than 100%. So if you add 3 sections of 25% each and then add a final section of 30% (giving you a total weight of 105%), the template designer will not allow you to create the template.
How do I decide how much a section should weigh?
When deciding how to weight a section, ask yourself how important the section is compared to other sections. If you take the classic Elevator Pitch as an example, the Problem section has a higher weight than the starting Hook, because the Problem is more important to talk about.
Saving your new pitch template
So, you’re satisfied with your pitch template and want to make your hard work available to your students? Great!
If the total weight of the sections is precisely 100%, click on the Create This Template button in the lower left corner. Your pitch template is then created and will be put into the list of pitch templates under Templates.
Making your template public to your students
Now, your pitch template is not yet publically available to your students just yet. You need to make it public first by clicking on the grayed out circle with an “X” icon under the “Published to students” column of templates list.
Confirm that you’re ready to publish it and in a few seconds, the icon will turn green with a checkmark. Your pitch template will then be available to your students in their list of templates in the tool.
Great work!